I. Game Background
1.1 World Setting
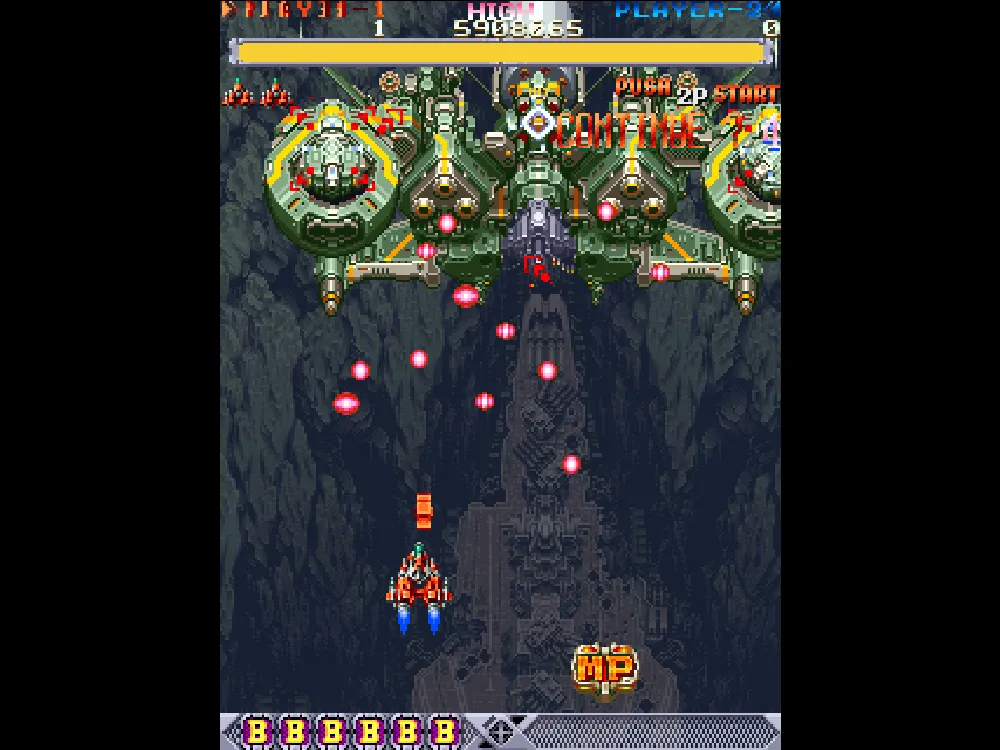
The story of DoDonPachi takes place in a near-future world that seems like a standard trope but hides a shocking twist. On the surface: a mechanized alien legion has invaded Earth, and humanity's last hope rests with an elite fighter squadron called "DonPachi." Players pilot the most advanced super-weapon fighters, diving deep into enemy lines to shatter the hive-like mechanical legion all the way to the core of the alien mothership.
However—this narrative, which holds true during the first playthrough (the first loop), is completely subverted in the second loop. If you clear the first loop under extremely strict conditions (losing no more than two lives, achieving a specific high combo, or scoring over 50 million points), Colonel Schwarlitz Longhener reveals a chilling truth: the so-called "aliens" are actually your own colleagues—human comrades who were trying to stop you from going deeper. Colonel Longhener himself orchestrated this "war," believing humanity to be a failed creation whose problems of overpopulation, pollution, and arms races could only be "solved" through a "one-man war." Piloting the super-fighter "Hibachi" as the true final boss, Longhener waits in the deepest part of the hive for a final showdown.
In 1997, the narrative of DoDonPachi was groundbreaking for an arcade shooter—it imbued storm after storm of pure bullet hell with a dark and heavy narrative weight.
1.2 Development History
DoDonPachi was released by CAVE in Japanese arcades on February 5, 1997, and published by Atlus. It was CAVE's second game and the sixth title on their first-generation arcade hardware (the CAVE 68000 board). The core development team included producer Kenichi Takano, designers Akira Wakabayashi, Hiroyuki Tanaka, and Junya Inoue, and programmer Tsuneki Ikeda—the latter of whom would go on to become the lead creator behind CAVE classics like DoDonPachi DaiOuJou, Mushihimesama, and Ketsui.
Its predecessor, DonPachi (1995), had already established the basic framework of the "bullet hell" genre, but DoDonPachi upgraded every dimension: doubling bullet density, introducing the Shot/Laser switching mechanism, the Get Point System (GPS), the 13-bee collection element, the MAXIMUM mode, and the famous second-loop true boss. The addition of the character "Do" (怒) to the title—which in Japanese implies an upgrade and is also an onomatopoeia for machine-gun fire—perfectly declared this to be a wilder bullet-hell carnival than its predecessor.
The game was ported to the Sega Saturn in September 1997, adding an exclusive "Saturn Mode" (new stages, new bosses, and difficulty customization), and to the PlayStation in September 1998. It was released on PSN Game Archives in 2010. It was featured in 1001 Video Games You Must Play Before You Die (2010) and described by Time Extension as "one of the most beloved entries in the series" and "a breathtaking piece of work."
II. Character Introduction
DoDonPachi offers three selectable fighters, each with distinct performance in Shot and Laser modes. Choosing a fighter + choosing a mode = six completely different gameplay experiences.
Type A — Red Fighter
| Attribute | Rating |
|---|---|
| Firepower (Shot Mode) | ★★★★☆ |
| Firepower (Laser Mode) | ★★★★☆ |
| Speed | ★★★☆☆ |
| Bullet Density | ★★★☆☆ |
| Difficulty | ★★☆☆☆ |
- Shot Mode: A narrow, concentrated stream of bullets with the densest forward firepower.
- Laser Mode: A straight, piercing laser beam.
- Pros: Balanced abilities with stable forward firepower. The best choice for learning the fundamentals of bullet hell shooters.
- Cons: Lacks unique features—no variable-angle shots like Type B or wide-area coverage like Type C.
- Overall Evaluation: The top choice for beginners. Type A's Laser hitbox is thin and damage is concentrated, making it the most efficient at dismantling boss parts.
Type B — Green Helicopter
| Attribute | Rating |
|---|---|
| Firepower (Shot Mode) | ★★★☆☆ |
| Firepower (Laser Mode) | ★★★★☆ |
| Speed | ★★★★☆ |
| Bullet Density | ★★★★☆ |
| Difficulty | ★★★★☆ |
- Shot Mode: Direct forward fire + rotatable side sub-cannons. The sub-cannons rotate based on the player's movement direction—turning left when moving left.
- Laser Mode: A wide piercing laser, with sub-lasers also rotating based on movement.
- Pros: The only fighter that can "adjust attack direction while moving." It has an irreplaceable advantage when dealing with enemies emerging from the sides or behind.
- Cons: Weakest forward firepower in Shot mode. Requires adaptation to the aiming offset caused by rotation.
- Overall Evaluation: The highest skill ceiling. Experts can weave through narrow bullet gaps while keeping the sub-cannons locked onto boss weak points—one of the most advanced techniques in any CAVE game.
Type C — Blue Fighter
| Attribute | Rating |
|---|---|
| Firepower (Shot Mode) | ★★★★★ |
| Firepower (Laser Mode) | ★★★☆☆ |
| Speed | ★★☆☆☆ |
| Bullet Density | ★★★★★ |
| Difficulty | ★★★☆☆ |
- Shot Mode: Wide-angle three-way spread. Covers a 120-degree area in front.
- Laser Mode: Three parallel piercing lasers.
- Pros: Widest coverage in Shot mode—beginners only need to aim roughly in the enemy's direction to hit. Highest efficiency for clearing out fodder enemies.
- Cons: Slowest movement speed, leaving the least room for dodging in later, bullet-dense stages. The three-laser DPS in Laser mode is lower than A and B against bosses.
- Overall Evaluation: The king of mob clearing, the challenger of boss fights. Type C is for players who prefer "firepower coverage" over "precision sniping." In the high-density bullet patterns of the later stages, Type C's slow movement requires extreme micro-precision to compensate.
III. Controls
3.1 Basic Controls
| Button | Action | Description |
|---|---|---|
| 8-Way Joystick | Move | Standard vertical shooter movement. Note: The hitbox is tiny—only a few pixels at the center of the nose |
| A Button (Tap) | Shot | Standard spread fire. Normal movement speed |
| A Button (Hold) | Laser | Sub-cannons combine into a piercing beam; movement speed slows, and an offensive aura surrounds the ship. Combo counter does not drop while the laser touches an enemy |
| B Button | Bomb | Two modes: Shot mode releases a full-screen clearing explosion; Laser mode fires a high-power piercing beam |
3.2 Core Systems
Shot/Laser Switching—The Soul of the Design: Tap A = Shot (high speed + wide area clear); Hold A = Laser (slow speed + focused fire + combo maintenance). Every second, you choose between Shot and Laser—high-speed movement to dodge vs. slowed output to maintain combos. This is the fundamental difference between DoDonPachi and all previous shooters: it's not just "shooting," it's "a constant, instantaneous decision between survival and scoring."
Bomb System: Starts with 3 bombs; +1 for every life lost, up to 6. Shot bomb = defensive screen-clear; Laser bomb = offensive piercing beam (great for boss burst damage).
Combo System (Get Point System / GPS): The most important scoring mechanic:
- Combo counter rises when enemies are destroyed in succession.
- The counter has a fast-decaying progress bar—if you stop attacking, the combo resets in about 0.5 seconds.
- Continuous Laser contact maintains the combo.
- Higher combo = more points per enemy.
- Boss fights use a Hit Counter—rises with Laser hits, drops if Laser stops.
Bee System: 13 hidden glowing bees per stage. Use the Laser on specific spots to reveal them. Points start at 100 and double with each collection: 100 → 200 → 400 → 800 → 1,000 → 2,000 → 4,000 → 8,000 → 10,000 → 20,000 → 40,000 → 80,000 → 100,000. Losing a life resets the next bee to 100 points. Collecting all 13 is a requirement for the second loop.
MAXIMUM Mode: Triggered by picking up a B item when bombs are full. Points increase automatically at at least 220 points per second (paused during boss fights). Multiplier starts at 2x, +1 for every extra bomb. Ends upon using a bomb or losing a life, but the multiplier carries over between stages. This encourages players to avoid using bombs to accumulate massive MAXIMUM multipliers.
IV. Stage Walkthrough & Boss Strategy
DoDonPachi has 6 stages in the first loop. Meeting specific conditions unlocks the second loop, and clearing the 6th stage boss of the second loop leads to the hidden final stage—the "Hibachi" true boss fight.
4.1 Stage 1: Over the City
| Item | Content |
|---|---|
| Scene | A future city engulfed in war. Skyscrapers burn in the background. Enemy density is relatively low—the only stage where you can easily "sightsee." |
| Boss | Giant Land Battleship (Mid-Boss) + Armored Train Cannon (Stage Boss)—a super-heavy train moving at high speed. Fires large homing energy shots, with small turrets on both sides spreading bullets. |
| Strategy | Tutorial level. Core goals: ① Learn the rhythm of Shot/Laser switching; ② Realize how small the hitbox is—you'll find that grazing bullets isn't dangerous. Try to collect all 13 bees here (a requirement for the second loop). |
4.2 Stage 2: Industrial Zone
| Item | Content |
|---|---|
| Scene | A massive industrial base. Steel furnaces, conveyor belts, and mechanical arms. Some ground targets rise to become floating turrets—requiring quick Shot/Laser switching. |
| Boss | Giant Excavator (Mid-Boss) + Hexapedal Fortress (Stage Boss). Each of the six legs has a rotating turret; once destroyed, the core is exposed for high-speed dash attacks. |
| Strategy | Bullet density increases significantly. Practice "slowed precision movement" with the Laser. For the fortress, dismantle all leg turrets first (otherwise the density is overwhelming), then attack the exposed core. The core predicts your position before dashing—move in the opposite direction just before it strikes. |
4.3 Stage 3: Aerial Fleet
| Item | Content |
|---|---|
| Scene | A massive fleet above the clouds. From here on, "bullet hell"—dense bullet nets covering half the screen—becomes the norm. |
| Boss | Large Aerial Battleship (Mid-Boss) + Super-Giant Flying Fortress (Stage Boss). The core is protected by multi-layered rotating armor. Spiral bullet patterns are fired while the armor rotates. |
| Strategy | Spiral patterns have fixed trajectories—they look suffocating but have fixed safe gaps. The key is to find the gap and stay there—don't chase the bullets. Type C's Shot mode is recommended here for wide-angle coverage while dodging. |
4.4 Stage 4: Underground Waterway
| Item | Content |
|---|---|
| Scene | Deep in the enemy's drainage system. Narrow spaces—vertical movement is limited, making horizontal movement the primary way to dodge. |
| Boss | Giant Submersible Mech (Mid-Boss) + Twin Sea-Serpent Boss (Stage Boss). Two mechanical serpents act independently, creating a crossfire of linear and spread bullets. |
| Strategy | The ultimate test of horizontal micro-movement. The tactic is "kill one first"—the crossfire is almost impossible to dodge with both alive. Prioritize the one firing spread bullets (on the right), then take on the remaining one. Switch to Laser mode for finer horizontal control. |
4.5 Stage 5: Spaceport
| Item | Content |
|---|---|
| Scene | A giant spaceport in Earth orbit. The background shifts to deep space. Bullet density reaches the peak of the first loop. |
| Boss | Orbital Defense Satellite Array (Mid-Boss) + Super-Giant Space Battleship (Stage Boss). The bow has a charging main cannon—fires a full-screen width beam after 3 seconds. Move to the edge to dodge. |
| Strategy | The tell is obvious—the bow glows and energy particles converge. Move to the far left or right immediately. If you still have a MAXIMUM mode active, this is the best time to use it—the long boss fight window maximizes the automatic scoring. |
4.6 Stage 6: Mothership Core
| Item | Content |
|---|---|
| Scene | The deepest part of the alien mothership. Bio-mechanical walls pulse rhythmically. Few fodder enemies—replaced by environmental bullet traps (spore launchers, falling energy spikes). |
| Boss | Ultimate Weapon (First Loop Final Boss)—a giant humanoid mech with multiple forms. Each layer of armor destroyed triggers a new attack pattern. |
| Strategy | The final test of everything learned. Changing forms requires constant adjustment of positioning and weapon modes. Shot for drones, Laser for the main body. Note: If you met the second-loop conditions, the game continues after this boss. If not, the game ends here (Normal Ending). |
4.7 Second Loop & Hidden Stage: Hibachi
| Item | Content |
|---|---|
| Unlock | Clear the first loop on 1 credit and meet one of: ① Lose no more than 2 lives; ② Type A combo ≥ 270 / Type B ≥ 300 / Type C ≥ 330; ③ Score ≥ 50 million; ④ Collect all 13 bees in at least 4 stages. |
| Second Loop | All stages/bosses remain, but density increases drastically—if the first loop is a "storm," the second is a "tsunami." Clearing the 6th stage boss unlocks the hidden stage. |
| Hidden Boss 1 | Hachi (Bee)—a giant mechanical wasp, ~80x the size of your ship. Attacks include stinger thrusts, scale-dust bullet spreads, and homing poison needles. |
| Hidden Boss 2 | Hibachi (Fire Bee)—the true final boss. A burning abyss-wasp piloted by Colonel Longhener. Bullet density reaches the peak of CAVE history—the screen is covered in red-and-white nets with only single-pixel gaps. Defeating Hibachi grants the True Ending. |
| Strategy | A challenge to human reaction limits. The core strategy is: Stay Calm. The patterns look impenetrable, but every wave has a fixed path and gap—it's about observation, not randomness. Do not use bombs (you need to maintain the MAXIMUM multiplier). Study the visual cues and micro-movements for every pattern. This is likely the longest period of intense focus you will ever experience in a boss fight. |
V. Tips and Advanced Strategy
5.1 Basic Survival
- The Hitbox is the center pixel—not the whole ship: As long as the center point doesn't touch a bullet, you are safe. Grazing is key.
- Shot to dodge, Laser to attack: Shot mode is for fast horizontal dodging; Laser mode is for precision and combo maintenance. Don't hold one button the whole time.
- Bombs are not just for saving lives—they are combo protectors: If you can't maintain a combo, a well-timed bomb clears the screen and gives you time to reposition.
- Don't miss the bees: They are essential for the second loop and high scores. Memorizing their locations is the first lesson for any serious player.
- The "No-Bomb" Philosophy of MAXIMUM Mode: To accumulate massive multipliers, you must avoid using bombs. This forces you to rely on pure movement—the most hardcore and rewarding part of the game.
5.2 Understanding the Combo System
- The combo counter has a "protection" window: Continuous Laser contact pauses the decay. In sparse areas, sweep a large enemy with the Laser to "bridge" the combo until the next wave.
- Boss Hit Counters are separate from GPS: Scoring in boss fights is based on hits, not kills. Keep the Laser on the boss as long as possible.
- Don't ignore ground stars: Small stars are 300 points, large ones 10,000. Collecting them in bullet gaps adds up significantly.
5.3 Advanced Trivia
- Second loop patterns are "choreographed," not random: Every bullet's trajectory, speed, and position are meticulously planned. Watching expert replays is the best way to "study."
- "Bee Sound": There is a subtle sound cue when a bee is activated. Turn down the BGM and turn up the SFX—a standard setting for veterans.
- Saturn Mode: The Saturn port adds new stages, bosses, and density adjustments, providing a smoother difficulty curve.
- The Legendary "Campaign Version": A special arcade board from a 1997 high-score contest. It featured extreme density and a prototype of the "Hyper Mode" later seen in DaiOuJou. Only one is confirmed to exist, and the source code is lost—making it the "Holy Grail" of arcade collecting.
VI. Legends and Arcade Lore
6.1 The "Violent Aesthetics" of the Title
"DoDonPachi" (怒首領蜂) is an Ateji—using kanji to force a pronunciation. The literal meaning is "Angry Leader Bee," but the sound is an onomatopoeia for machine-gun fire. It is arguably one of the most perfect multi-lingual titles in gaming history.
6.2 Tsuneki Ikeda—The "Composer" of Bullet Hell
Lead programmer Tsuneki Ikeda viewed bullet patterns with a musical sensibility. He believed the ideal pattern should have "structure and rhythm like a piece of music." His philosophy is why CAVE games feel like a "melody line" rather than just obstacles.
6.3 The Narrative Trap
Most players think the game ends after the first loop. Only those who meet the strict conditions discover the truth: you are not the hero, but a pawn. This practice of hiding the "True Ending" behind a second loop is extremely rare and turns the act of "entering the second loop" into a narrative revelation.
6.4 The Campaign Version—The Game Only One Person Owns
Awarded to the winner of the 1997 Saturn launch contest, "ZBL-NAI." It is the rarest official arcade board in existence, with only one copy confirmed to remain worldwide.
6.5 Establishing the Bullet Hell Genre
While games like Gradius were difficult, DoDonPachi turned "weaving visual spectacles out of dense bullets" into a core design goal, creating the "Bullet Hell" (Danmaku) sub-genre.
6.6 "IBO-USAGI" and Sound Design
CAVE insisted that every bullet type have a corresponding sound effect, allowing players to "judge the pattern with their eyes closed."
6.7 Influencing a Generation of Indies
From Crimzon Clover to Undertale, the DNA of DoDonPachi—its combo system, choreography philosophy, and second-loop structure—is echoed throughout modern indie gaming.
6.8 "1CC Second Loop Hibachi"—The Ultimate Achievement
Fewer than 100 people in history have defeated Hibachi on original hardware in a single credit. It requires 45-55 minutes of continuous, extreme focus with no saves, no pauses, and no rest. It is the equivalent of a world championship trophy.