Dungeons & Dragons: Shadow over Mystara — The Ultimate CPS2 Action RPG
I. Game Background
1.1 World Setting
In the D&D world of Mystara, a shadow of catastrophe is spreading. It all began in the "Broken Lands" north of the Republic of Darokin—once-bustling trade routes are now overrun by humanoid monsters, and travelers and caravans are vanishing one by one. But this threat is far greater than mere orc raids: a mysterious witch named Synn is pulling the strings. She wields power beyond mortal comprehension, with a single goal—to awaken "The Fiend," an ancient entity capable of destroying civilization itself.
A party of up to four adventurers is commissioned by the Darokin Merchants' Guild to investigate this escalating threat. Their journey will take them through ghost-infested rivers, sky-high cities, cursed forests, and rifts consumed by magical fire, eventually leading to Synn's floating magical fortress. Along the way, they will encounter heroes from the past controlled by Synn, dragons awakened from antiquity, and a disturbing truth—the lich Deimos, defeated in the predecessor Tower of Doom, was merely a pawn in Synn's grand design.
However, the adventurers' fate is not a straight path. At key junctures, every choice made in the mist leads the story in a completely different direction—will you traverse the Forest of Despair to face the gaze of a Beholder, or seek help from the ancient city of Aensun? Will you aid a gnome village threatened by a Chimera, or delve into a labyrinth to track the witch? Each route features unique bosses, treasures, and endings. When finally confronting Synn, the adventurers' equipment and loot will determine whether they achieve victory or face total annihilation.
1.2 Development History — A Legendary Collaboration between Capcom and TSR
Dungeons & Dragons: Shadow over Mystara was released by Capcom in 1996, running on the CPS2 arcade hardware. This was the second and final D&D arcade title produced under license from TSR (the original publisher of D&D) and serves as a direct sequel to Tower of Doom (1993).
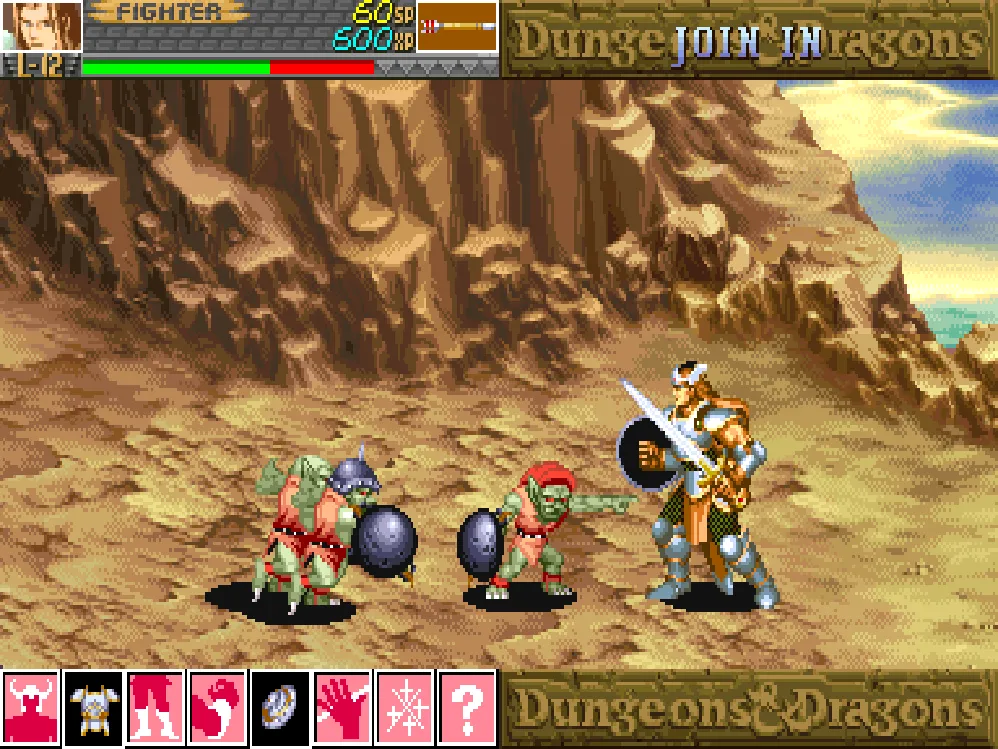
The development team was led by designers Kenji Kataoka and "Malachie," with a script by Alex Jimenez and a soundtrack by Masato Kouda. Technically, this title represents a peak for the CPS2 hardware late in its lifecycle—the fluidity of animation rivals X-Men: Children of the Atom. Capcom remained exceptionally faithful to D&D tabletop rules—the Vancian spell system (fixed daily spell slots per level), weapon and equipment restrictions (Clerics cannot use bladed weapons), and a host of monsters pulled directly from the D&D Monster Manual (Displacer Beast, Beholder, Chimera).
Beyond the standard CPS2 six-button layout, the game utilized a special kick harness to provide four dedicated action buttons—Attack, Jump, Select Item, and Use Item. This provided the hardware foundation for its comprehensive equipment and spell systems.
If Tower of Doom proved that "beat-'em-ups could incorporate RPG elements," then Shadow over Mystara pushed that concept to its absolute limit. It is not only the most complex beat-'em-up Capcom ever created but is also widely considered one of the greatest arcade games of all time. In 2011, Gamespy ranked it 50th on its list of "Top 50 Arcade Games of All Time," calling it "one of the purest fun games ever made." IGN ranked it the 9th best D&D game of all time in 2014.
In 2013, Capcom bundled this title with its predecessor as Dungeons & Dragons: Chronicles of Mystara for Wii U, PS3, Xbox 360, and Windows, adding modern features like online co-op and character stat visualization, allowing a new generation of players to experience this legendary work.
II. In-Depth Analysis of the Six Classes
Shadow over Mystara expanded the playable roster from four to six, adding the Thief and Magic-User. Each class has two appearance/name combinations, allowing two players to select the same class:
Overview of the Six Classes
| Class | Default Characters | Role | Weapons | Armor Limit | Special Abilities |
|---|---|---|---|---|---|
| Fighter | Crassus / Jarred | Frontline Tank | Almost all melee, dual-wield | Full Armor | Dual-wield short swords, longest reach |
| Elf | Lucia / Kayla | Fighter-Mage | Elven swords, short weapons | Light Armor, low defense | Arcane magic + melee, shortest reach |
| Cleric | Greldon / Miles | Healer/Off-Tank | Maces/Staves, no blades | Full Armor | Divine healing/buffs, Turn Undead, best rush attack |
| Dwarf | Dimsdale / Hendel | Heavy Melee | Battle axes/hammers | Heaviest armor | Highest HP, early level cap, smash chests for gold |
| Thief | Moriah / Shannon | Agile Assassin | Daggers/Short swords | Medium Armor | Double jump, wall jump, backstab, lockpick, steal, infinite stones |
| Magic-User | Syous / D'raven | Spell Cannon | Staves/Daggers | No armor, most fragile | Strongest spells, teleport, invincibility, weakest physical |
Class Deep Dives
Fighter — Crassus / Jarred
The Fighter is the most balanced and forgiving choice. With "excellent move sets, the longest weapon reach, high durability, and the best armor class," he is perfect for beginners and lethal in the hands of experts. The Fighter is the only class that can dual-wield—he can equip a short sword in his off-hand while using a greatsword or longsword in his main hand. This simple feature fundamentally changes his attack rhythm, allowing for faster combos and compensating for the slow speed of heavy weapons.
Stats Overview:
- Attack: 4/5 Stars
- Defense: 5/5 Stars
- Speed: 3/5 Stars
- Skill Variety: 3/5 Stars
- Difficulty: 1/5 Stars
- Pros: Longest reach, highest armor, dual-wielding, versatile weapon usage
- Cons: No spells (relies on consumables), limited options against flying enemies
- Verdict: The first choice for beginners and the most reliable for veterans. The Fighter is the team's anchor, soaking up damage while dealing consistent physical output.
Elf — Lucia / Kayla
The Elf is the game's unique hybrid—possessing both the Fighter's melee capability and the Magic-User's arcane spells, though she is not as powerful as either specialist. As a female elven swordswoman, her weapon reach is the "shortest in the game"—her blade is naturally shorter than the Fighter's, and even when picking up longer weapons, her hit detection range remains unchanged.
Stats Overview:
- Attack: 3/5 Stars
- Defense: 2/5 Stars (Low constitution/defense)
- Speed: 4/5 Stars
- Skill Variety: 5/5 Stars
- Difficulty: 3/5 Stars
- Pros: Access to most arcane spells (Lightning Bolt, Fire Ball, Invisibility, etc.), better survivability than the Magic-User
- Cons: Shortest reach, low defense makes her vulnerable in melee, early level cap reduces late-game utility of magic items
- Verdict: A high-ceiling character for experienced players. The Elf's true strength lies in her ability to switch to spell-casting mode at any time—she is the only character who can seamlessly transition between melee and magic.
Cleric — Greldon / Miles
The Cleric is the game's only pure healer, but he is by no means a "back-row support" character. His melee ability is quite strong—he possesses the game's "best rushing attack," and his mace deals satisfying damage. His divine spells include Cure Wounds, Mass Cure, Bless, Hold Person, and the iconic Turn Undead—which can instantly kill undead enemies (skeletons and ghouls).
Stats Overview:
- Attack: 4/5 Stars
- Defense: 4/5 Stars
- Speed: 2/5 Stars
- Skill Variety: 4/5 Stars
- Difficulty: 3/5 Stars
- Pros: Only source of healing, best rushing attack, Turn Undead instant-kills, wears heavy armor
- Cons: Cannot use bladed weapons (strict D&D rules), slow movement, lower attack frequency than dedicated melee classes
- Verdict: If the team has a Cleric, the survival rate skyrockets. The Cleric's healing is the key to clearing high-damage late-game boss fights. Turn Undead is a devastating weapon in specific stages.
Dwarf — Dimsdale / Hendel
The Dwarf has the highest HP and the strongest physical burst damage. His power is concentrated in Special Attacks rather than normal attacks. His short stature has an unexpected benefit—he can safely pass under the projectiles of many humanoid enemies, a unique advantage against archers and mages. Another unique skill: the Dwarf can use a "smash" action on empty, already-opened treasure chests to find hidden extra gold and loot.
Stats Overview:
- Attack: 5/5 Stars
- Defense: 4/5 Stars
- Speed: 2/5 Stars
- Skill Variety: 3/5 Stars
- Difficulty: 2/5 Stars
- Pros: Highest HP, highest physical burst, amazing special attack damage, short stature avoids projectiles, extra gold from chests
- Cons: Slowest movement, early level cap, narrow weapon selection
- Verdict: The Dwarf is a "consistent return" character. Once he hits his level cap early on, he stops growing, meaning consumable magic items (like the Bottle of Efreet) remain at a fixed power level. However, in terms of physical output, his damage speed against most bosses is unrivaled.
Thief — Moriah / Shannon
The Thief is the most mobile character. She possesses a set of movement skills other classes can only dream of—double jump, wall jump, backflip (for evasion), and screen-warp (dashing from one side of the screen to the other). Her combat style relies on positioning and backstabbing—attacking from behind deals massive extra damage. The Thief also has "infinite stones"—she can throw stones at distant enemies at any time.
Stats Overview:
- Attack: 3/5 Stars (Front) / 5/5 Stars (Backstab)
- Defense: 3/5 Stars (Cannot use shields)
- Speed: 5/5 Stars
- Skill Variety: 5/5 Stars
- Difficulty: 5/5 Stars
- Pros: Unmatched mobility, high backstab damage, lockpicking and trap detection, stealing items from enemies, highest level cap (best growth)
- Cons: Low frontal damage, average constitution and lack of shields make her fragile in stationary fights, extremely dependent on player skill
- Verdict: High difficulty, high reward. The Thief's high level cap means she benefits the most from consumable magic items—the Bottle of Efreet is far more powerful in her hands than any other class. A skilled Thief player looks like they are dancing—always moving, always behind the enemy.
Magic-User — Syous / D'raven
The Magic-User is the game's strongest spellcaster—and the most physically fragile. He can cast the full spectrum of arcane magic—from basic Magic Missile to world-ending Meteor Swarm, from Lightning Bolt to Polymorph, covering almost all classic D&D spells. The Magic-User also has a unique teleport-evasion move that can dodge almost all physical attacks; this move can even be chained into combos.
Stats Overview:
- Attack (Physical): 1/5 Stars / (Magic): 5/5 Stars
- Defense: 1/5 Stars
- Speed: 3/5 Stars
- Skill Variety: 5/5 Stars
- Difficulty: 5/5 Stars
- Pros: Highest spell damage, most comprehensive spell list, teleport-evasion for high survivability (when mastered), Staff of Wizardry boosts spell power, temporary invincibility spells
- Cons: Weakest physical stats, extremely easy to die for beginners, relies on knowledge of spells and enemy configurations, cannot use shields
- Verdict: The ultimate definition of "difficult but rewarding." The gap between a skilled Magic-User and a novice is wider than any other class. The Magic-User requires deep knowledge of enemy types, boss attributes, and timing. Once mastered—he is a walking natural disaster.
III. Controls and Mechanics
3.1 Four-Button Basics
| Button | Function | Description |
|---|---|---|
| A (Attack) | Attack | Normal attack, press repeatedly for combos |
| B (Jump) | Jump | Standard jump, can be combined with directions for jump attacks |
| C (Select) | Item Select | Opens the circular item menu, use direction to select |
| D (Use) | Use Item | Uses the currently selected item or casts a spell |
3.2 Special Move Command System
Shadow over Mystara introduced special move commands similar to fighting games:
| Move | Command | Cost | Description |
|---|---|---|---|
| Dash Attack | Forward x2 + Attack | None | Fast dash and attack, can combo |
| Rising Attack | Down -> Up + Attack | None | Shoryuken-style attack, launches enemies for follow-ups |
| Juggle | Rising Attack + Jump + Air Attack | None | Follow-up attack on launched enemies |
| Megacrush | Use Button (Specific conditions) | HP | Full-screen damage, consumes own HP (Magic-User/Cleric cannot use) |
Megacrush is a vital "save-your-life" move—it deals damage to all enemies on screen but costs the user health. It is most effective when used by all four players simultaneously, but be careful not to "crush" yourself to death when low on health. Magic-Users and Clerics cannot use this move.
3.3 Spell and Item System
The Spell System follows the classic D&D Vancian mechanism. There is no MP bar—each spell has a fixed number of "prepared uses" (daily spell slots). Picking up spell scrolls on the ground restores uses. When you cast a spell, the screen freezes briefly, and the full-screen effect plays (some spells allow directional input during the freeze). Spells are divided into two categories:
- Arcane Spells: Used by Magic-Users and Elves. Includes Magic Missile, Fire Ball, Lightning Bolt, Ice Storm, Cloudkill, Polymorph Other, Meteor Swarm, Invisibility, etc.
- Divine Spells: Used only by Clerics. Includes Cure Light Wounds, Cure Serious Wounds, Hold Person, Bless, Continual Light, Striking, etc.
Clerics also have the "Turn Undead" ability—use it in front of undead enemies to instantly kill skeletons and ghouls; it is an invaluable treasure in specific stages.
The Item System uses a circular menu. Press C (Select) to bring up the item ring, use the directional pad to rotate and select, and press D (Use) to activate. The equipment system includes 8 slots: Helmet, Armor (fixed for each character), Magic Boots (damageable), Magic Gauntlets (damageable), Shield (Magic-Users/Thieves cannot use), Magic Ring (damageable), Item Slot, and Special Items (boss drops like Displacer Beast skin).
Equipment quality is divided into four tiers—Common (White), Magic (Blue), Rare (Red), and Legendary (Gold). Legendary gear like the Sword of Legends will be named after the highest-scoring Fighter player on the arcade leaderboard—a highly personalized design.
3.4 Shop System
After completing Stage 3 (regardless of route A or B), the party arrives at the city of Glantri, the game's first fixed shop. Additional shops appear between various stages:
- Purchase Consumables: Arrows, Burning Oil, Throwing Daggers, Healing Potions
- Sell Loot: Gold and treasures found in stages can be sold for gold
- Special Trades: Certain boss drops (e.g., Skin of the Displacer Beast, Eye of the Beholder) can be traded by clicking on the shopkeeper's head to exchange rare items for unique magical gear.
Shopkeepers often spout classic "Engrish" lines, the most famous being "Welcome to the D&D world!" While the English is broken, this awkward pronunciation and strange grammar made it an enduring community meme. In the 2013 HD remaster, Capcom kept the original voice acting to universal acclaim—no one wanted to lose these "perfectly terrible" audio memories.
IV. Stage Flow and Boss Strategy — The Complete 10-Stage Branching Route
Shadow over Mystara features the most complex branching route system in arcade beat-'em-up history. There are four critical route choices, each leading to entirely different bosses and stages. Below is the complete flow (based on Arcade Quartermaster data):
Stage 1 — "Descent from the Broken Lands"
- Setting: Northern Republic of Darokin, rocky wasteland
- Main Enemies: Goblins, Gnolls, Riyakaas (Goblin chariots)
- Note: Prologue stage, no named boss. Primarily for familiarizing with controls. The final scene involves pushing goblins off a cliff. The party then boards a boat to track Synn.
Stage 2 — "The Village of Trintan"
- Setting: Riverside village occupied by goblins, burning buildings
- Main Enemies: Goblin soldiers, archers, elite Gnolls
- Boss: War Machine — Goblin-made siege tank, 10,000 XP
- Strategy: The War Machine's attacks include frontal rams and side arrows. Staying at its side/rear is safest. It is large but slow to turn; use dash attacks to pass through it for efficient damage.
First Route Choice: Land or River?
Route 3-A: "To Ride a Juggernaut" — Overland, shorter but more enemies Route 3-B: "Battle on the Vesuvia" — By boat, safer but longer
Stage 3-A — "To Ride a Juggernaut"
- Setting: Trade route on the wasteland
- Boss: Dark Warrior 1 — 15,000 XP
- Strategy: Uses lightning attacks and summons skeletons. The lightning has a wide range; watch his hand-raising animation to predict and dodge. Prioritize clearing skeletons to reduce pressure. Drops good loot.
Stage 3-B — "Battle on the Vesuvia"
- Setting: Fighting on a raft on the Vesuvia River
- Boss: Man Scorpion / Man Scorpions — 15,000 XP
- Strategy: River-exclusive boss. Uses giant claws and tail stings. Ghouls and Troglodytes join as reinforcements. If you don't reach the flag checkpoint within 30 seconds, a Black Dragon appears—a brutal time penalty. Clear reinforcements before focusing on the Man Scorpions.
After 3-A or 3-B, the party reaches the Glantri City Shop.
Stage 4 — "Skies Over Aengmore"
- Setting: Deck of a flying ship
- Main Enemies: Harpy
- Boss 1: Harpy — 10,000 XP, appears at the bow
- Boss 2: Tel'Arin (First Encounter) — 8,000 XP, spellcaster. Uses Animate Dead, Fire Ball, Haste, Lightning Bolt. He will escape after defeat.
- Boss 1 Strategy (Harpy): Harpy's flight height varies; attacks with diving grabs. Use Rising Attack to knock her down, then combo on the ground. Magic-User's Lightning Bolt is highly effective against flying enemies.
- Boss 2 Strategy (Tel'Arin): This fight is a tutorial on facing spellcaster bosses. His Fire Ball has a wind-up (hands rubbing fire); interrupt him then. After Haste, he moves fast; hit him to cancel the effect.
Second Route Choice: Aensun, Forest of Despair, or Forest Bridge?
Route 5-A: "Riddle of Aensun" — Seek help from ancient Aensun Route 5-B: "Forest of Despair" — Traverse the cursed forest Route 5-C: "Forest Bridge" — Cross with an Elven guide (Requires an Elf in the party)
Stage 5-A — "Riddle of Aensun"
- Setting: Ancient ruins
- Boss: Ogre Master Brothers — 15,000 XP
- Strategy: A pair of Ogre bosses. When the first reaches low health, the second joins. Separating them is key—have one player (or the agile Thief/Elf) distract one while the others focus on the other. Their hammer swings have large AOE and high damage.
Stage 5-B — "Forest of Despair"
- Setting: Cursed dark forest
- Boss: Beholder — 25,000 XP
- Strategy: One of D&D's most iconic monsters—a floating brain/flesh ball with eye stalks. When the central eye bulges, all spells are nullified—this is the Beholder's Anti-Magic Field. Magic-Users and Elves must switch to physical attacks. Avoid wasting spells during the field. Drops the precious Eye of the Beholder. Highest risk, highest reward route.
Stage 5-C — "Forest Bridge" Elf-only route
- Setting: Natural stone bridge high above the forest
- Boss: Green Dragon — 30,000 XP
- Strategy: Breath attack is Cloud of Poison, which causes temporary paralysis—you cannot move, and the dragon can follow up with massive claw/bite damage. Lowest XP of the three dragons. Drops Scales of the Dragon. Only accessible if an Elf is in the party.
Stage 6 — "The Battle of Strong Oak"
- Setting: Elven ruins (if coming from 5-A or 5-B)
- Boss 1: Manticore — 25,000 XP (Skipped if coming from Forest Bridge)
- Boss 2: Lich — 30,000 XP
- Boss 1 Strategy (Manticore): Attacks include tail spikes (ranged), claws (mid), and tail sweep (close). Ranged spikes are annoying; get close to force melee mode. May drop Skin of the Manticore.
- Boss 2 Strategy (Lich): One of the most dangerous regular bosses. Spell pool includes Meteor Swarm (full-screen, lethal), Wall of Fire, Teleport, Animate Dead, Fire Ball, and Lightning Bolt. Physical attacks cause paralysis. Cleric's Turn Undead is effective against skeletons. Meteor Swarm has a long wind-up—interrupt him when the sky changes color.
Stage 7 — "Grove of Destruction"
- Setting: Forest twisted by evil magic
- Main Enemies: Goblins
- Boss: Displacer Beast — 40,000 XP
- Strategy: Iconic monster—a black panther with two tentacles. Its special ability is "displacement"—its visual position is slightly offset from its actual hit-box. Judge hits between the shadow and the body. Drops Skin of the Displacer Beast—a rare item for trading.
Third Route Choice: Labyrinth or Gnome Village?
Route 8-A: "Forest Labyrinth" — Continue tracking the witch Route 8-B: "Rescue at the Gnome Village" — Help the besieged village
Stage 8-A — "Forest Labyrinth"
- Setting: Complex magical maze; 4 wrong turns trigger a penalty boss
- Boss: Blackwing / Black Dragon — 50,000 XP (Penalty boss, not mandatory)
- Strategy: Acid breath is a cone attack with high damage. Physical attacks include claws and tail sweeps. Drops Scales of the Dragon. Can be avoided if the correct path is taken.
Stage 8-B — "Rescue at the Gnome Village"
- Setting: Village shrunk to one foot tall
- Boss: Chimera — 55,000 XP
- Strategy: Hybrid monster—Lion head (front), Goat head (back), Dragon head (tail), Snake head (tail tip). Multiple heads mean attacks from different directions. Lion head handles melee; Dragon head breathes fire; Snake head strikes from behind. Focus on the main body (Lion), but watch for rear attacks. Highest XP route.
Intermission — "Cave of Rafael the Immortal"
Regardless of 8-A or 8-B, the party reaches this plot point:
- Setting: Ancient Red Dragon lair
- Boss: Deathwing / Red Dragon — 700,000 XP (Highest in the game)
- Strategy: One of the most terrifying bosses. Has three life bars. Fire breath triggers instant death—if hit, you die regardless of HP. Rafael asks three questions. Correct answers: "NO, NO, YES." If wrong, the dragon breathes instant-death fire. Watch for the wind-up animation (mouth opening)—stop attacking and dodge. Drops Horn of the Dragon, one of the most valuable items.
Fourth Route Choice: Fire, Frost, or Underworld?
Route 9-A: "Land of Fire" — Stone bridge over lava Route 9-B: "Lost World" — Frozen ancient caves Route 9-C: "Secret Underworld" — Dwarven-guided tunnels (Requires a Dwarf in the party)
Stage 9-A — "Land of Fire"
- Setting: Volcano interior
- Boss: Flame Salamander — 70,000 XP
- Strategy: Immune to fire damage. If you relied on Fire Ball or Burning Oil, this is tough. Switch to physical or cold spells. Attacks include lava spray and tail sweeps.
Stage 9-B — "Lost World"
- Setting: Frozen caves
- Boss: Frost Salamander — 70,000 XP
- Strategy: Immune to cold attacks. Freezes players in place. Unlike the fire route's instant-death risk, the threat here is being frozen and unable to dodge follow-up attacks.
Stage 9-C — "Secret Underworld" Dwarf-only route
- Setting: Underground tunnels
- Boss 1: Tel'Arin (Final Encounter)
- Boss 2: Tel'Eleron — 55,000 XP total
- Strategy: Both are sword-wielding spellcasters. There is a "peaceful solution"—if you kill Tel'Arin without harming Tel'Eleron, Tel'Eleron breaks free from mind control and thanks you. The most narratively deep boss fight.
Stage 10 — Air Castle
Six continuous parts, no shops, no rest:
Stage 10-1 — "Gateway"
- No named boss. Solve the puzzle by matching patterns on the walls to the pedestals.
Stage 10-2 — "Overtures"
- Boss: Tel'Arin (Grand Master 1: The Swordsman) — 50,000 XP
- Strategy: One-on-one duel. If you didn't kill him in 9-C, he appears alone. Pure sword fight; spells are less effective than physical attacks. Watch his pattern—3-hit combo leaves a window for counter-attack.
Stage 10-3 — "The Arena"
- Boss: Ezerhorden (Grand Master 2: The Phantom) — 80,000 XP
- Strategy: Dark punches track you. Lightning magic is his "fatal weakness"—Magic-User is invaluable here. Without one, you need more potions and patience.
Stage 10-4 — "Battle Royal"
- No named boss. Endless stream of enemies—gargoyles, elementals, and knights. Different doors require different elemental attacks to pass.
Stage 10-5 — "The Arena Revisited"
- Boss: Dark Warrior 2 (Grand Master 3: The Behemoth) — 90,000 XP
- Strategy: Giant Dark Warrior with a greatsword. Death magic can one-shot low-HP characters. If you have the Holy Shield, these attacks can be blocked—a rare example of specific gear changing boss strategy.
Stage 10-6 — "Inner Heart, Dark Heart"
- Boss 1: Nagpa (Grand Master 4: The Summoner) — 10,000 XP
- Strategy: Summons a Black Dragon and Manticore. Clear summons first—the dragon's acid and Manticore's spikes create too much pressure. Nagpa uses Lightning Bolt and Teleport; he is relatively fragile.
- Final Boss: Synn — 500,000 XP
- Strategy: Three phases, three life bars. Phase 1: Witch form (Lightning/Fire Ball). Phase 2: True form (Red Dragon). Fire breath has instant-death effect. Phase 3: Flying (requires tracking/ranged attacks like Lightning Bolt, stones, or arrows). Similar to Deathwing but faster and more aggressive.
- Special Ending Condition: If 3+ players are present, total party XP exceeds 1,000,000, and the Magic-User has the Staff of Wizardry, the staff glows at the final moment, allowing the team to use the "Final Strike"—instantly defeating Synn.
After defeating Synn, the story ends. The ending animation varies based on your route choices. The airship fleet bombs the fortress, and Synn's plans fall with the castle.
V. Tips and Advanced Strategy
5.1 Survival Tips
- Manage spell uses. Vancian system means no infinite spells. Magic-Users must judge: "Is this enemy worth a Fire Ball?" Save high-level spells for bosses.
- Invest in consumables. Healing Potions are the best investment. Burning Oil is great for boss damage—throw it at their feet for continuous fire damage.
- Know boss drops. Displacer Beast Skin, Beholder Eye, Red Dragon Horn—these are for trading. Don't use them as items.
- Cleric positioning. Don't stand in front of the boss. Stand at the side/rear to heal and use rushing attacks.
- Dwarf chest smashing. Every empty chest is potential gold. Only Dwarves can find it.
- Megacrush is not free. It costs HP. Don't use it when low on health. In multiplayer, damage stacks, but everyone loses HP.
5.2 Team Synergy
Optimal Party: Fighter (Tank) + Dwarf (Physical DPS) + Cleric (Healer/Off-DPS) + Magic-User (Ranged Magic).
- Fighter: Aggro management.
- Dwarf: Consistent physical damage.
- Cleric: Global healing and Turn Undead.
- Magic-User: Burst damage for bosses.
Recommended Duos:
- Elf + Cleric: Versatile.
- Fighter + Magic-User: Classic tank/cannon.
- Thief + Dwarf: High mobility/burst.
5.3 Boss Rules
- Watch wind-ups. All spellcasters have unique animations. Interrupt them.
- Instant-death breath. Red Dragon/Synn breath has a 1-2 second wind-up. Run!
- Prioritize summons. Lich/Nagpa summons cause chain-stuns. Clear them first.
- Use throwing items. Daggers/Oil are safe ways to chip away boss health.
- Rafael's riddle: NO, NO, YES.
VI. Trivia and Arcade Legends
6.1 TSR License — End of an Era
In the early 90s, TSR was in a difficult transition. Licensing D&D to Capcom was bold. Tower of Doom (1993) and Shadow over Mystara (1996) proved the potential. TSR was acquired by Wizards of the Coast in 1997, making Shadow one of the last D&D games licensed during TSR's independent era.
6.2 Voice Acting — "Perfectly Terrible"
Lines like "Welcome to the D&D world!" are iconic. The broken English and strange accents are part of the charm. The 2013 HD remaster kept them, and fans loved it—no one wanted them re-recorded.
6.3 "Infinite Combos"
Core players discovered techniques using frame-perfect inputs to keep enemies in permanent stun-lock. It requires 1/60th-second precision, proving the game's depth even a decade later.
6.4 CPS2 Swan Song
Released in 1996, Shadow was one of the last Capcom beat-'em-ups on the CPS2. It represents the "final form" of 2D action games—perfectly blending RPG depth, arcade rhythm, and 4-player co-op.
6.5 Hidden Equipment Depth
Many effects, like the Staff of Wizardry's spell damage boost, are never explained in-game. The "Final Strike" condition was a closely guarded arcade secret for years.
6.6 "Sword of Legends" Naming
Legendary weapons are named after the highest-scoring Fighter on the machine. It was one of the most clever "social features" in arcade history.
6.7 Tabletop to Arcade Loop
Players found exact D&D rule correspondences. Conversely, DMs used the game's stage designs as adventure modules—a rare "Tabletop -> Arcade -> Tabletop" cycle.
6.8 Gnome Village Humor
Attacking the tiny gnomes causes them to scream and run. It's a pointless detail, but it shows the "warmth" of Capcom's design philosophy.
FAQ
Q1: What is the relationship between *Shadow over Mystara* and *Tower of Doom*?
Q2: Which class is best for beginners?
Q3: How do I trigger the Elf and Dwarf routes?
Q4: How do I get the "True Ending"?
Q5: When should I use Megacrush?
Q6: Why can't the Cleric use swords?
Q7: What are boss drops like the Displacer Beast Skin for?
Dungeons & Dragons: Shadow over Mystara was ahead of its time. In 1996, while most arcade games chased faster rhythms and flashier effects, Capcom chose a different path—injecting the soul of a tabletop RPG into a coin-op machine. Vancian spells, branching narratives, equipment quality, hidden bosses—no other arcade game dared to try all these at once. It proved that great design transcends medium—whether you're rolling a twenty-sided die or mashing an arcade stick, the feeling of adventure is the same.